Create a Shopify instance in Odoo
To create your Shopify instance in Odoo, navigate to and click on CREATE.
Choose a meaningful name for your Instance (e.g.
TeqStars Store), and selectShopifyon Marketplace.On Credentials tab, fill the Shop URL and API Access Token. If you don’t have API Access Token then you can use your Shopify App Password by disabling the I have API Access Token option. When using API Access Token, you can use Generate Access Token (OAuth) with Client ID and Secret; see Generate Shopify API Access Token (Custom App – New Flow) for details. If you don’t have API credentials, refer to the link below.
Let’s begin with the instance configuration process for the Shopify Odoo Connector. By following configurations you’ll be able to set up and customize the integration according to your business needs. Let’s get started!
Last Processed On
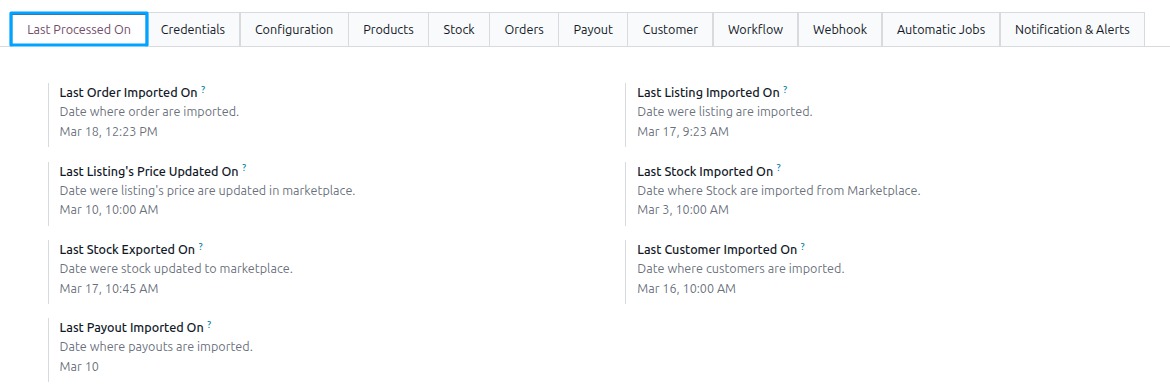
Last Processed On refers to date that indicates the last time a specific operation or task was processed or executed. It typically represents the date and time of the most recent successful execution of a particular operation.
In most cases, the Last Processed On date is set when the Automatic Jobs are executed.
Configurations
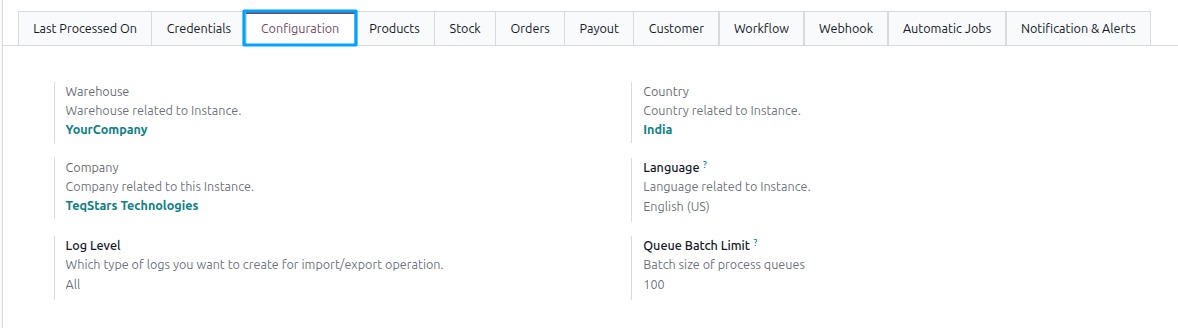
Warehouse: This warehouse will be act as default warehouse for the instance.
Company: Choose company related to instance.
Log Level: Choose which type of log level would you like to have. You can choose between
ALL,SUCCESS, orERROR. default toERROR. The system will create logs for each marketplace operation. To view the logs, navigate toQueue Batch Limit: Default to 100 records. we aren’t suggesting to change this.
Note
To modify the Queue Batch Limit, activate the developer mode and navigate to and click on Configuration tab.
Product Configurations
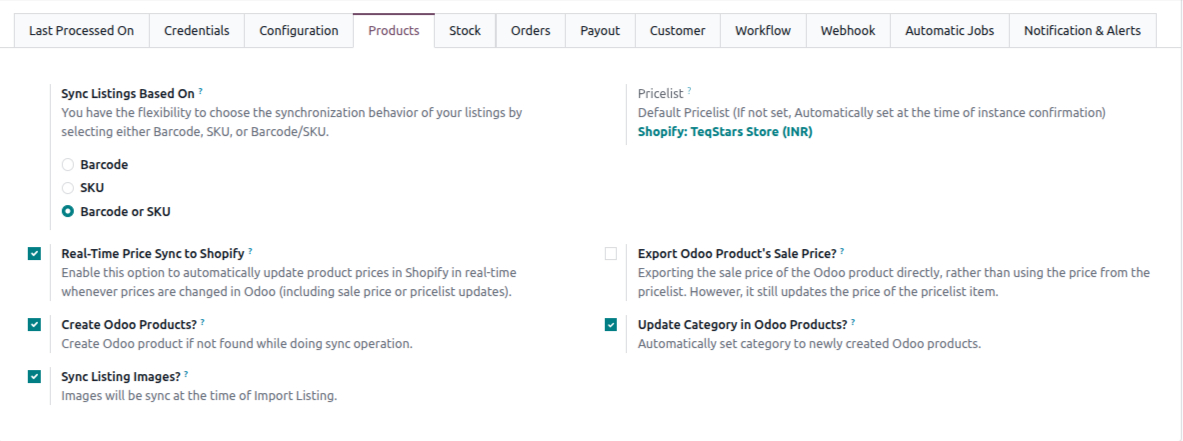
Sync Listings Based On
Select the parameter based on which you would like to synchronize the products from Shopify to Odoo. You have the option to choose between
Barcode,SKU, orBarcode and SKU. Set the parameter based on which you want to sync the products from Shopify to Odoo.
Pricelist
Pricelist refers to a pricing configuration that determines the prices of products during the product sync operation between Shopify and Odoo. When prices are imported/exported during synchronization, this pricelist is used to set the appropriate prices.
When the order currency from the Shopify store matches the currency set in the pricelist during the import order operation, the pricelist is applied to the order in the Odoo ERP system.
Export Odoo Product’s Sale Price?
When exporting Odoo products, the standard behavior is to export the prices based on the pricelist configured in Instance. However, if you want to export the product’s sale price directly, bypassing the pricelist, you can customize the export functionality by enabling this option.
Real-Time Price Sync?
When Real-Time Price Sync to Shopify is enabled on the instance, Odoo automatically updates Shopify prices whenever the price changes in Odoo, based on the Pricelist & Export Odoo Product’s Sale Price? configuration. This keeps prices in real-time sync without running a manual export.
Create Odoo Products?
Enabling the Create Odoo Products? option allows the Shopify Odoo Connector to automatically create new products in your Odoo catalog when a matching product is not found based on the SKU or Barcode as per configured in Sync Listings Based On. This feature streamlines the product synchronization process by creating products in Odoo, ensuring that all products from your Shopify store are accurately represented in your Odoo ERP system.
Tip
If you already have existing products in your Odoo ERP system, it is not recommended to enable the Create Odoo Products? option in the Instance.
Update Category in Odoo Products?
This ensures that when a new product is added to the Odoo ERP system, it is automatically set category received from Shopify.
Sync Listing Images?
This means that the images associated with the products or items being imported from the Shopify store to the Odoo ERP. By syncing the listing images during the import process, the images will be available and properly associated with the respective listings within the Odoo system.
Stock Configurations
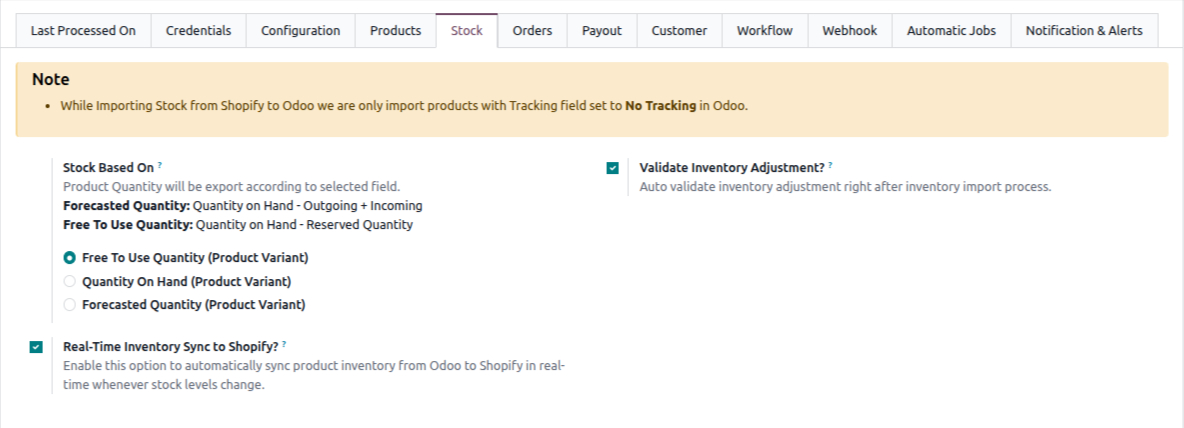
Stock Based On
When exporting Inventory from Odoo to Shopify, you can choose
Free To Use Quantity,Quantity On HandorForecasted Quantityconfiguration based on your requirements, ensuring accurate inventory management between Shopify and Odoo.Tip
Forecasted Quantity: Quantity on Hand - Outgoing + Incoming
Free To Use Quantity: Quantity on Hand - Reserved Quantity
Validate Inventory Adjustment?
The system automatically confirms the inventory adjustment after importing inventory data. By enabling Validate Inventory Adjustment?, the inventory adjustment is automatically marked as validated without requiring manual intervention.
Note
While Importing Stock from Shopify to Odoo we are only import products with Tracking field set to Tracking into Odoo products.
Real-Time Inventory Sync?
When Auto Sync Inventory to Shopify is enabled on the instance, Odoo automatically updates Shopify inventory whenever stock changes in Odoo, based on the Stock Based On configuration. This keeps stock levels in real-time sync without running a manual export.
Orders Configurations
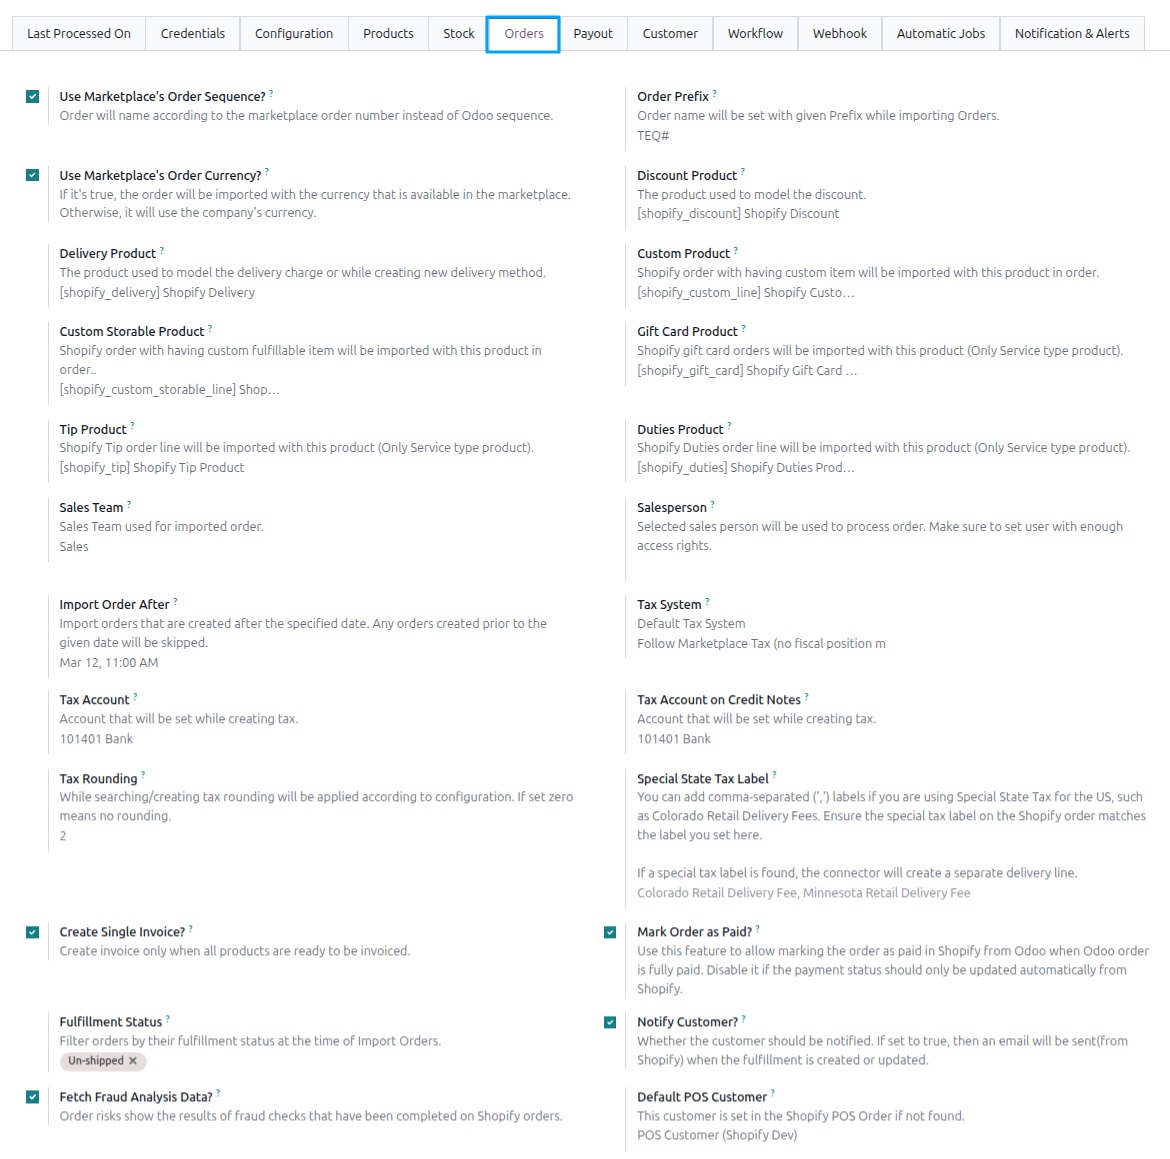
Use Marketplace’s Order Sequence?
This feature allows you to name orders in Odoo based on the Shopify order number rather than using the default Odoo sequence. This ensures that the order names in Odoo correspond directly to the order numbers generated by the Shopify platform, providing consistency and easier cross-referencing between Odoo and the Shopify.
Order Prefix
This feature allows you to specify a prefix that will be added to the names of imported orders. When importing orders from your Shopify store to your Odoo ERP system, the connector will automatically set the order name with the given prefix. This helps to easily identify and distinguish the imported orders in your Odoo system.
Use Marketplace’s Order Currency?
When enabled, allows the importing orders to be assigned the currency available in the Shopify. In this case, the order currency will match the Shopify’s currency.
If the feature is disabled, the company’s default currency will be used for the imported orders. This feature ensures that the order currency aligns with the Shopify’s currency, providing accurate financial records and simplifying currency management within the Odoo ERP system.
Discount Product (Only visible in developer mode)
This allows you to define a specific product in Odoo that will be used as a discount line item when syncing orders from Shopify. When a discount is applied to an order in Shopify, the connector will create a line item in Odoo using the predefined Discount Product with the corresponding discount amount. This ensures accurate recording and tracking of discounts within Odoo, providing a comprehensive view of order details and facilitating proper accounting and reporting for discounted products in your business operations.
Delivery Product (Only visible in developer mode)
This allows you to define a specific product in Odoo that will be represent the charges associated with the delivery of orders from your Shopify store.
While creating a new delivery method, you can associate the “Delivery Product” with that particular method. This indicates that the associated product will be used to calculate and represent the delivery charges for orders using that delivery method.
Custom Product (Only visible in developer mode)
This feature allows for the seamless import of Shopify orders containing custom items into Odoo. These custom items, typically consumable products, will be imported as separate products within the order in Odoo.
Gift Card Product (Only visible in developer mode)
Allows the import of Shopify gift card orders using a specific product. This product is designated as a service type product, specifically meant for gift cards. When a Shopify gift card order is received, it is imported into Odoo using this product.
Tip Product (Only visible in developer mode)
When a customer adds a tip to their order on the Shopify store, the connector identifies it as a tip order line and imports it into Odoo using the designated tip product.
Duties Product (Only visible in developer mode
When a Shopify order includes duties (e.g. customs), the connector imports the duties line using this service-type product.
Custom Storable Product (Only visible in developer mode)
Shopify orders that contain custom fulfillable (storable) items are imported with this product for those lines when no matching product is found.
Create Separate Discount Line? (Only visible in developer mode)
When enabled, the connector creates a separate negative discount line for order discounts. When disabled, Odoo’s default discount percentage on the order line is used.
Default POS Customer (Only visible in developer mode)
If a customer is not found during the order process in Shopify POS, the Default POS Customer is automatically assigned to the order in Odoo. This ensures that there is always a customer associated with the order.
Create Single Invoice? (Only visible in developer mode)
If a single invoice should be created once all items in an order are available for invoicing. When set to True (default), the invoice is generated only after all products are ready. If set to False, invoices can be created separately for each product as it becomes ready.
Special State Tax Label (Only visible in developer mode)
Stores a custom label for state-specific taxes or fees, such as Colorado Retail Delivery Fees. Multiple labels can be added, separated by commas, for different tax categories or special fees. If a special tax label is found, the connector will create a separate delivery line for the tax or fee.
Mark Order as Paid?
When enabled, the connector can mark the order as paid in Shopify from Odoo when the Odoo order is fully paid. When disabled, payment status is updated only automatically from Shopify.
Sales Team
By configuring this feature, you can ensure that all imported orders from Shopify are automatically assigned to the specified default Sales Team in Odoo.
Salesperson
Select a salesperson who will be responsible for processing the orders received from your Shopify store. It is important to ensure that the assigned user has sufficient access rights in Odoo.
Import Order After
This feature allows you to import orders from your Shopify store that were created after a specific date. By setting this date, any orders created before the specified date will be skipped during the import process.
Tax System
The tax system in Shopify Instance offers three options for handling taxes when importing orders from Shopify:
Odoo’s Default Tax Behaviour (Taxes will be taken from Odoo Product):
With this option selected, Odoo will use the tax information defined on the Odoo products and related fiscal rules. When importing orders from Shopify, the connector ignores Shopify tax lines and applies the taxes configured on the corresponding Odoo products. This keeps tax calculation fully aligned with your Odoo tax configuration.
Follow Marketplace Tax (no fiscal position mappings):
With this option, the connector follows the tax amounts coming from Shopify. For each tax in the Shopify order, Odoo looks for a matching tax; if it does not exist, a new tax can be created and linked to the configured Tax Account fields. The resulting Odoo taxes from Shopify are applied directly on the order and shipping lines without applying any fiscal position mappings.
Follow Marketplace Tax and applies fiscal position mappings:
This option also starts from the taxes provided by Shopify, creating or reusing matching Odoo taxes as needed. After determining the Odoo taxes based on Shopify tax lines, the connector applies the fiscal position of the order to remap those taxes before posting them on the order lines. This lets you respect Shopify tax amounts while still using Odoo fiscal position rules for accounting and reporting.
Tax Account
This allows you to specify the account to be associated with a tax when it is created in Odoo. This account is used for recording tax-related transactions and ensures accurate tracking and reporting of tax amounts within your Odoo ERP system. By setting the Tax Account, you can ensure that taxes are properly accounted for and integrated into your financial management processes.
Tax Account on Credit Notes
This allows you to specify the account to be associated with a tax when it is created in Odoo. This account is used for recording tax-related transactions and ensures accurate tracking and reporting of tax amounts within your Odoo ERP system. By setting the Tax Account, you can ensure that taxes are properly accounted for and integrated into your financial management processes.
Tax Rounding
When the Tax Rounding is enabled and set to zero, no rounding will be applied. This feature ensures that tax calculations are accurate and aligned with your specific tax regulations and requirements. By configuring Tax Rounding according to your needs, you can maintain precision in tax calculations within the Odoo Shopify Connector.
Fulfillment Status
When importing orders from Shopify to Odoo, you have the option to filter and import orders based on their fulfillment status at the time of import. This feature allows you to have better control over the orders you import into Odoo, ensuring that you focus on processing and managing orders that have already been Shipped or partially Shipped or UnShipped. It helps streamline your order management workflow by eliminating the need to manually filter and sort orders after importing them into Odoo.
Notify Customer?
Determines whether the customer should receive a notification. When set to true, an email is sent from Shopify to the customer when a fulfillment (shipping) is created or updated. This feature ensures that customers are promptly informed about the progress of their orders. It enables effective communication and provides transparency in the order fulfillment process.
Fetch Fraud Analysis Data?
It retrieves the results of fraud checks performed on Shopify orders. It allows you to access and view the order risks, which indicate the outcomes of the fraud analysis conducted on the orders. By fetching this data, you can gain insights into the potential risks associated with specific orders, helping you make informed decisions regarding order fulfillment, payment verification, and fraud prevention measures.
Payout Configurations
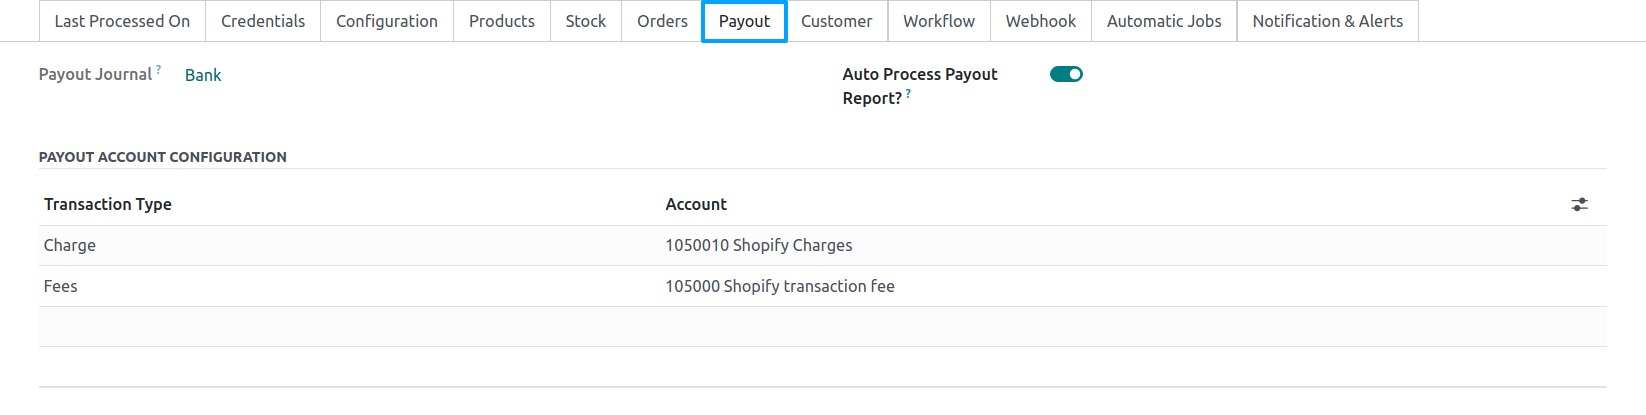
Payout Journal
This will use at the time of creation of Bank Statements in Odoo. It serves as a designated journal for recording payouts received from Shopify.
Auto Process Payout Report?
When importing payouts, the system automatically matches and processes the payout report with the corresponding invoices. This eliminates the need for manual intervention, streamlining the reconciliation process and ensuring accurate financial tracking.
Payout Account Configuration
The Transaction type and Account feature used for configuring the account associated with specific transaction types. Each transaction type represents a specific type of payout line, and the related account specified for that transaction type is used to record the corresponding transactions. This feature allows you to accurately track and categorize the financial transactions related to your Shopify store, ensuring proper accounting and reconciliation within Odoo. By assigning the appropriate account to each transaction type, you can maintain clear visibility and control over your Shopify store’s financial activities.
Note
This functionality exclusively applies to Shopify Payment services, meaning that it cannot be used to manage external or third-party payment service providers.
Customer Configurations

Receivable Account
This allows you to specify the default account for receivables when creating customers. By setting this field to Account Receivable instead of the default account, you ensure that the receivable transactions, such as invoices and payments, associated with the customer are correctly accounted for in the Odoo ERP system.
Create Company Contact?
When a contact is being created, the connector checks if there is a corresponding company. If found, it automatically generates a company contact, ensuring that the company’s information is properly recorded and linked to the contact in Odoo. This feature helps maintain comprehensive and organized company contact records within the system.
Metafield Configurations
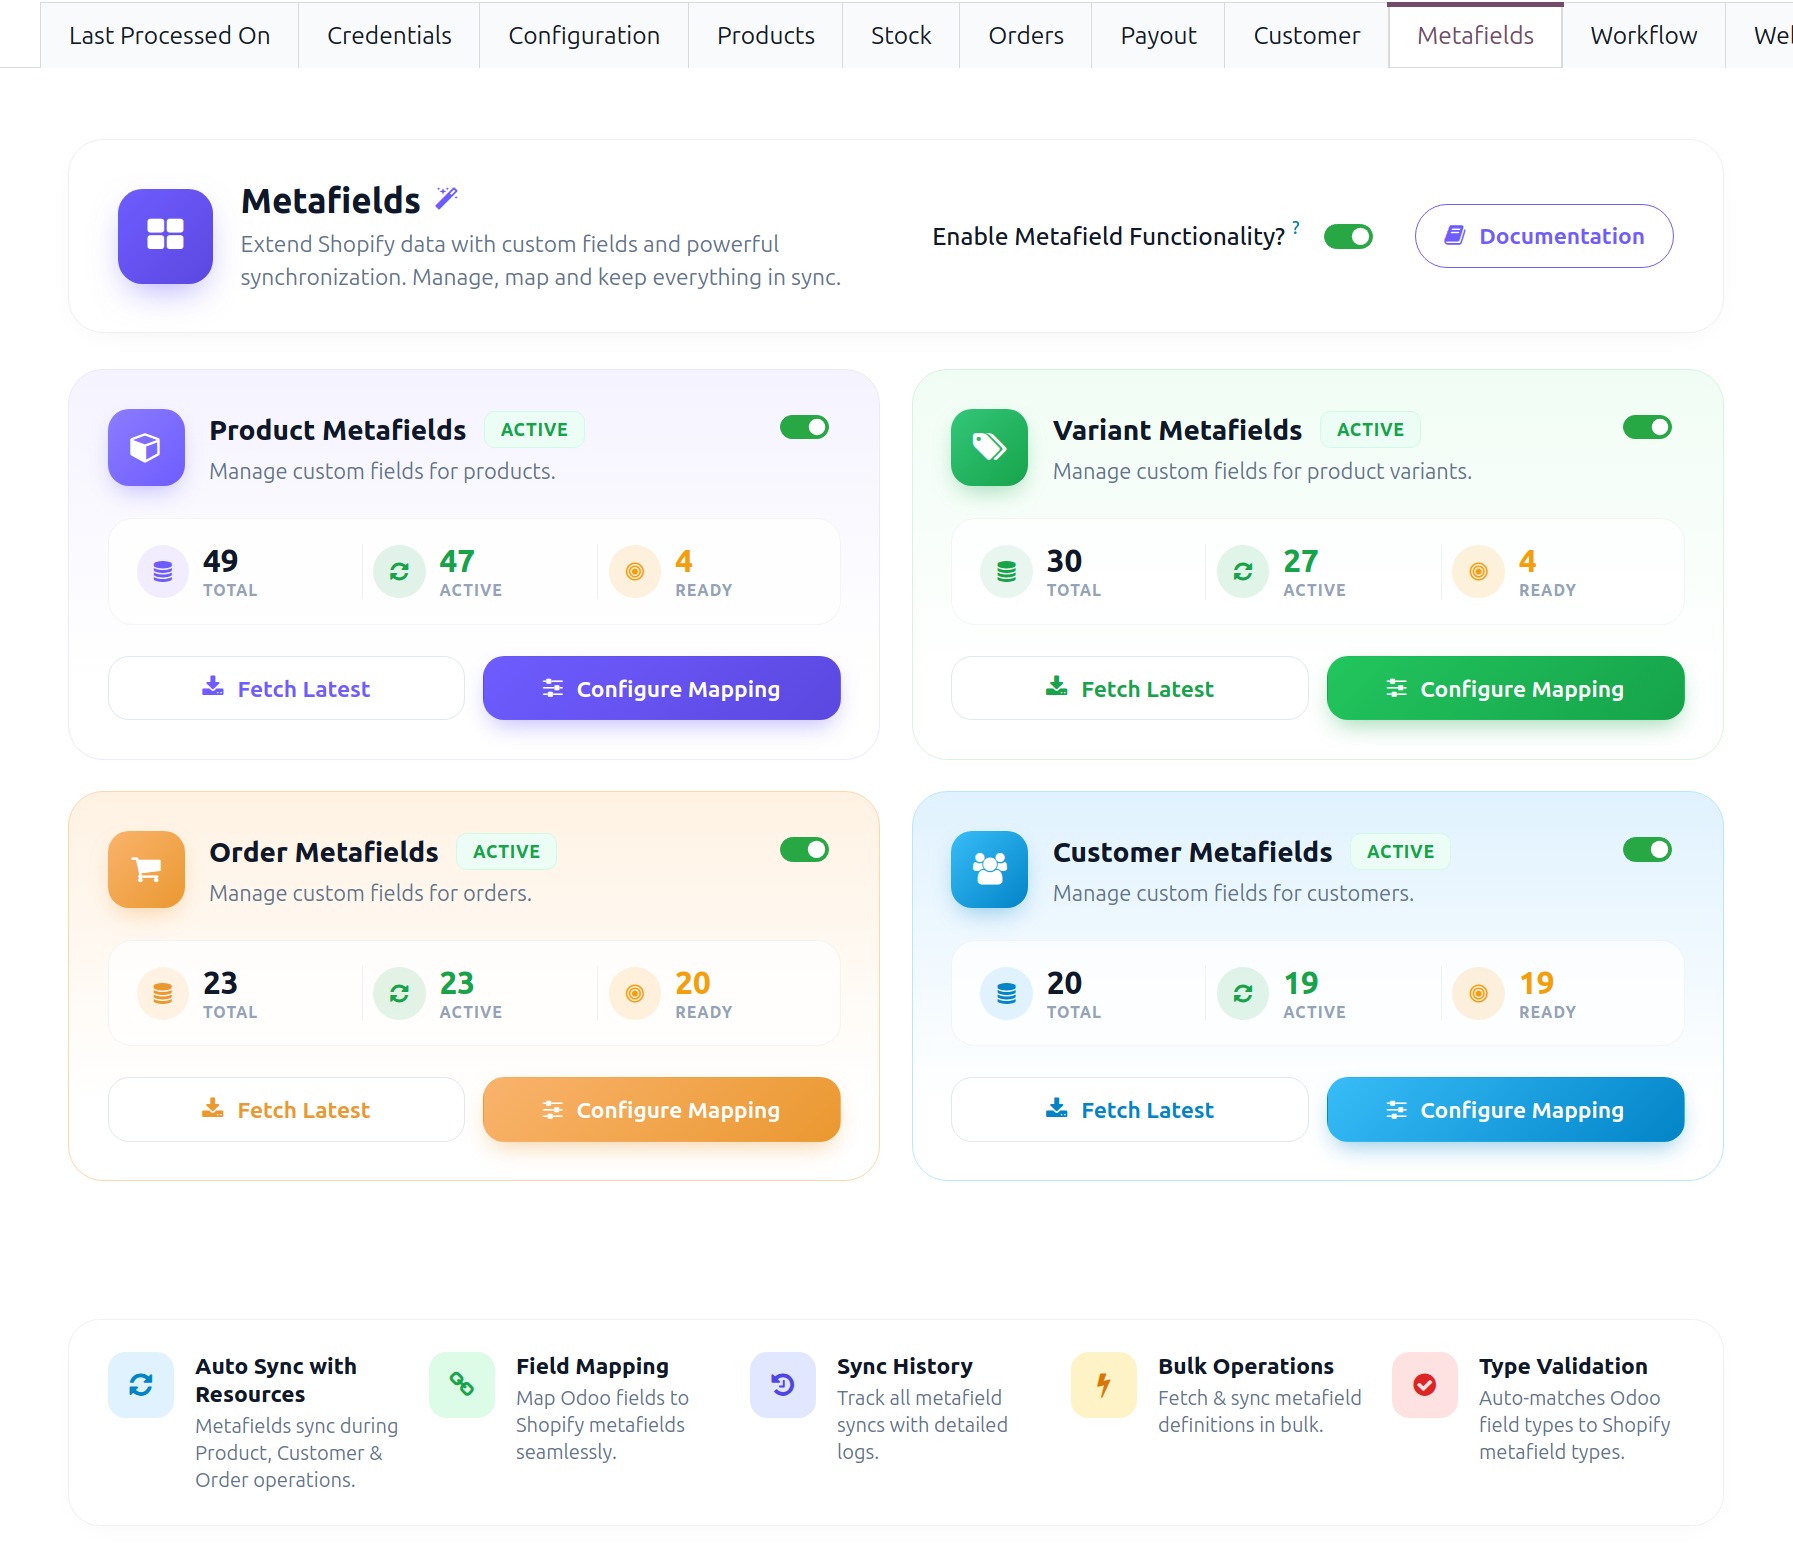
- What metafields do
Metafields are custom Shopify fields used to store additional information that is not available in Shopify’s standard fields.
The connector maps each Shopify metafield to an Odoo field. Mapped values are imported and exported as part of the regular import and export operations. There is no separate import or export operation for metafields.
- Supported metafield resources
Product Metafields sync with
Odoo ProductsVariant Metafields sync with
Odoo VariantsCustomer Metafields sync with
Odoo CustomersOrder Metafields sync with
Odoo Orders
How to enable or disable
Go to and open your Shopify instance.
Open the Metafields tab.
Toggle Enable Metafield Functionality? to activate the feature. Metafield resource cards will then appear for the supported resources.
On each card, use the per-resource Active toggle to enable or disable sync for that resource individually. When disabled, the card shows Sync inactive for this resource and the resource is skipped during import and export, even if mappings exist.
Metafield Resource Cards
Each card represents a specific Shopify resource (Product, Variant, Customer, or Order) and displays the Total, Active, and Ready metafield counts.
Total: Total metafield definitions fetched from Shopify for the resource. This includes all fetched metafields, whether they are configured or not.
Active: Total metafield mappings currently marked as active for the resource.
Ready: Total metafield mappings that are fully configured and ready for synchronization. A mapping is considered ready when an Odoo field is selected and the mapping is active. These mappings are used during related import or export operations.
The badge on the top-right of each card reflects the per-resource toggle state. When set to Active, the resource takes part in import and export, and its mapped metafields are synced in both directions. When set to Disabled, the resource is skipped during import and export, even if Enable Metafield Functionality? is on and mappings exist for it.
Fetch Latest
This option retrieves metafields from Shopify and updates the metafield mapping list for the selected resource.
When a new metafield definition is added in Shopify, running Fetch brings it in as a new row in the mapping list. When a definition is removed in Shopify, running Fetch removes the corresponding row from Odoo.
Configure Mappings
This option opens the metafield mapping list view for the selected resource. Each row in the list view represents one metafield.
To learn more about configuring metafield mappings, status badges, supported types, and how synchronization works, please refer to Configure Shopify Metafields.
Note
Make sure your instance is in Confirmed state to receive metafield definitions from Shopify.
The Fetch operation only adds new metafield rows and removes rows for metafields that were deleted in Shopify. It does not update existing metafield details such as name, key, namespace, or type. If a metafield is changed in Shopify, delete the existing row in Odoo and run Fetch again.
Turning Enable Metafield Functionality? off does not delete existing mappings, it only stops metafield synchronization. Re-enabling the toggle makes the existing mappings available for use again.
Customer Metafields and Order Metafields support only import functionality. Their values are imported from Shopify to Odoo during
Import CustomersandImport Orders. Updating these metafield values from Odoo to Shopify is not supported.
Workflow Configurations

Workflow is a configuration setting used in the Shopify Odoo Connector that enables the automatic processing of orders from Shopify. This workflow automates various actions, including confirming orders, creating invoices, validating invoices, and registering payments.
By setting up the Marketplace Workflow, you can streamline the order processing cycle and save time by eliminating manual interventions. The workflow ensures that orders from marketplaces are seamlessly processed and managed within your Odoo system.
- Payment Terms
Payment Terms are set in the order at the time of creation and specify when and how the customer is expected to make the payment for their purchase.
Marketplace Workflow
It enables the automatic processing of orders from marketplaces. This workflow automates various steps, including confirming orders, creating invoices, validating invoices, and registering payments.
To learn more about the details and configuration options of the Marketplace Workflow, please refer to the following link: Configure Marketplace Order Workflow
Payment Gateways & Financial Status
The order workflow can be defined based on the combination of the Payment Gateway used for the transaction and the Financial Status of the order.
Different Payment Gateways may have specific requirements or processes for handling payments and updating the Financial Status in Odoo.
The order processing is triggered based on the Financial Status received from the Payment Gateway.
By considering the Payment Terms, Payment Gateway, and Financial Status of an order, businesses can define an appropriate workflow that ensures smooth order processing, accurate payment handling.
Webhook Configurations
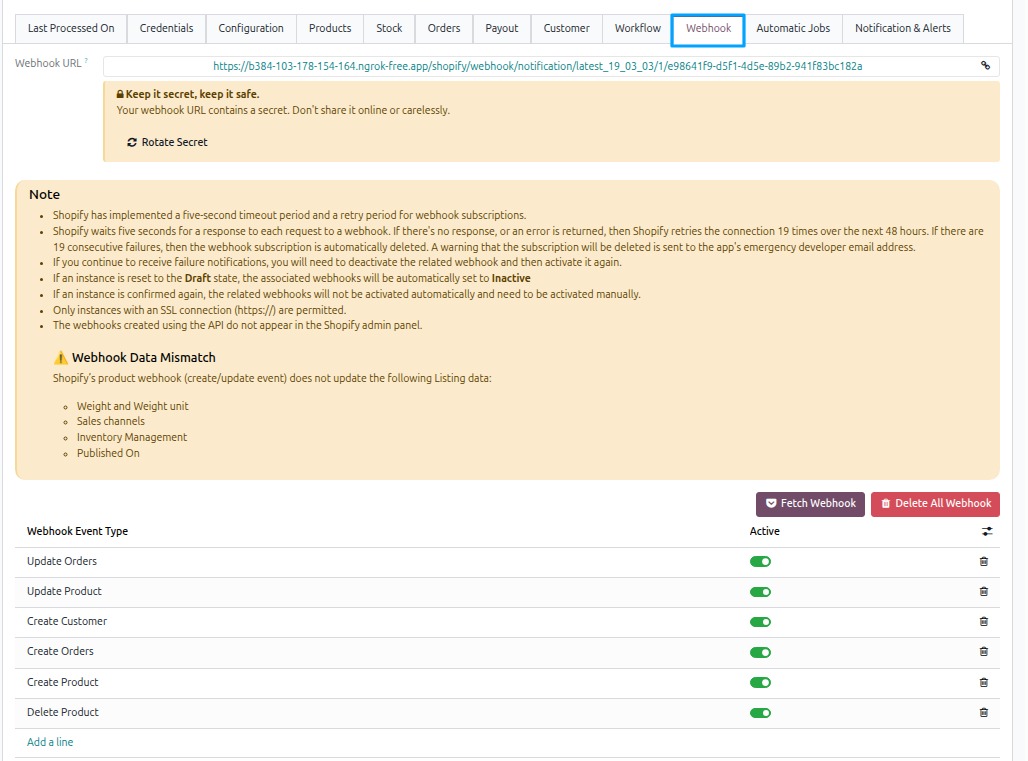
- What webhooks do
Webhooks allow Shopify to instantly inform Odoo when something happens in your store (like a new order, product update, or new customer).
This means Odoo updates automatically without waiting for Automatic Jobs.
It helps keep your data in sync in real time.
How to enable or disable
Go to and open your Shopify instance.
Open the Webhook tab.
Add a new line, select the Webhook Event Type, enable Active, and save.
Fetch Webhook
This option checks Shopify webhooks and brings all existing webhook settings into Odoo.
It helps ensure both Shopify and Odoo are using the same configuration.
Delete Webhook
This option removes all webhook connections from Shopify for your instance.
It is useful when you want to reset or reconfigure everything from scratch.
Clicking Delete Webhook will clear all existing webhook connections linked to your instance.
Note
Make sure your instance is in Confirmed state to receive webhook updates from Shopify.
To stop updates,
You can Turn off Active for Webhook Event Types.
Delete the webhook line.
Reset the instance to Draft state.
Webhook Events Types
Each event represents something that happens in Shopify, like a new order or a product update.
Create Orders (
orders/create)Triggered when a new order is created in Shopify.
Odoo automatically creates the order and process according to your Order Workflow.
Update Orders (
order/updated)Triggered when an existing order is updated in Shopify.
Odoo finds the existing order and updates it automatically with the latest changes from Shopify. It also continues the order process, such as updating delivery status, handling refunds, and updating pickup status when needed.
Create Products (
product/create)Triggered when a new product is created in Shopify.
Odoo stores all product information in Listings and Listing Items, including details like name, price, variants, and images. These are linked with Odoo products and variants.
If Create Odoo Products is enabled, Odoo automatically creates the product from these details and makes it ready for use. Otherwise, it skips the product creation and records a log.
Update Product (
product/updated)Triggered when a existing product is modify in shopify.
If a listing already exists in Odoo and the corresponding product is updated in Shopify, Odoo automatically updates the listing and listing items details to match the latest changes.
When Shopify product update webhook is triggered, It updates the data for both Listings and Listing Items.
For Listings, the webhook updates the Name, Price, SKU, Barcode, Tags, New Variants, Product Type, Description, Shopify Product Category, Update Date, and the Image (as per Product configuration).
For Listing Items, the webhook updates the Name, Price, SKU, Barcode, Update Date, and the Image (as per Product configuration).
Delete Products (
product/delete)Triggered when a product is deleted in Shopify.
Odoo removes the related Listings and Listing Items linked to that product.
This does not delete the actual product in Odoo.
Create Customers (
customer/create)Triggered when a new customer is created in Shopify.
Odoo automatically creates the customer and adds available details such as name, email, phone number, and address.
If the customer already exists in Odoo, the system avoids creating a duplicate and links the existing record instead.
Note
Your Odoo URL must use https://. Webhooks will not work if your system is not using a secure connection.
The instance must be in Confirmed state. Webhooks will only work after the instance is in confirmed state.
Warning
Webhook processing runs in a background thread after Shopify calls your endpoint.
Use to review success and errors for webhook operations.
When a product is created or updated in Shopify, some details are not updated automatically, such as: Weight, Weight Unit, Sales Channels, Inventory Management, Published On.
Automatic Jobs Configurations
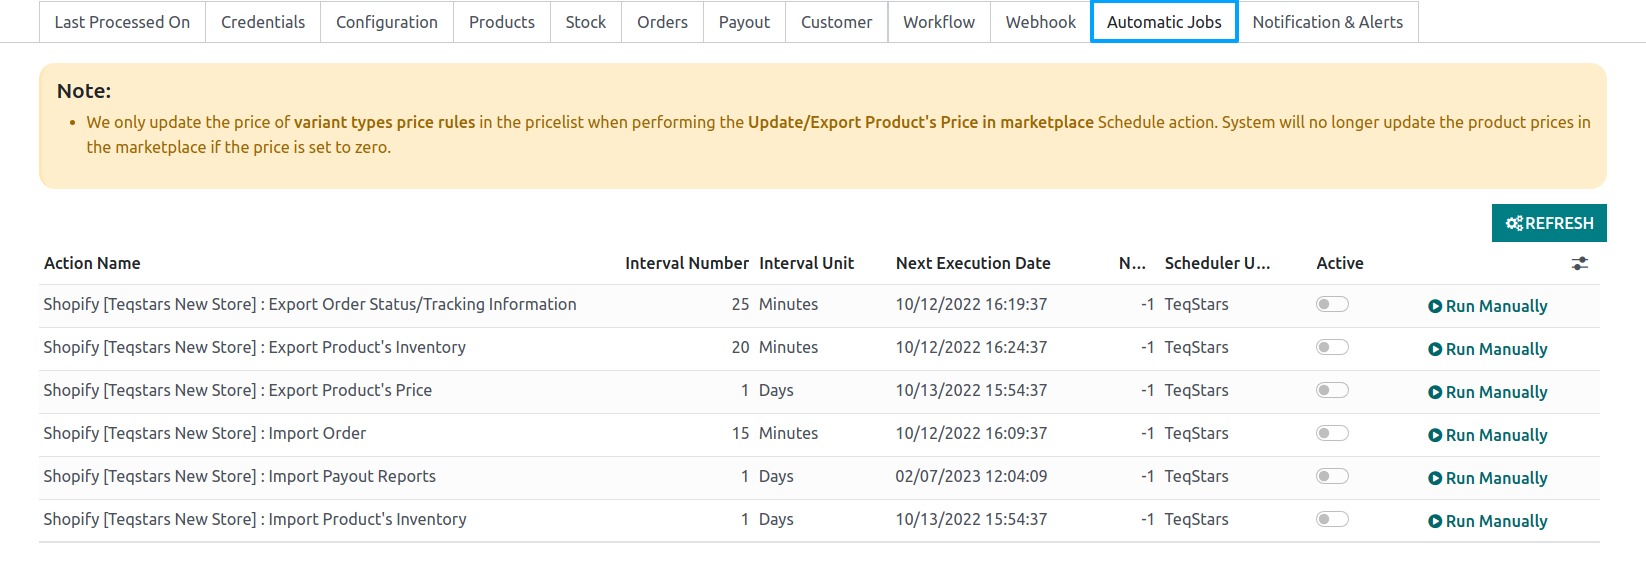
Automatic Jobs Configurations allow for the automation of various tasks related to exporting and importing data between Shopify and Odoo. These jobs are scheduled to run automatically at specified intervals to keep the data synchronized and up to date. You can configure Interval Number, Interval Unit, and Active for each job. Here’s an explanation of each Automatic Job.
Export Order Status/Tracking Information
This automatic job enables the automatic export of order status and tracking information from Odoo to Shopify.
It ensures that the order updates, such as shipment status and tracking numbers, are reflected accurately in Shopify.
Export Product’s Inventory
This automatic job the connector automatically exports the inventory levels of products from Odoo to Shopify.
It helps keep the product stock information synchronized between the two platforms, ensuring accurate stock availability on your Shopify store.
Stock Based On configuration will be used while export stock.
Export Product’s Price
This automatic job enables the automatic export of product prices from Odoo to Shopify.
Any changes in product prices in Odoo will be automatically reflected in the corresponding products on Shopify.
Pricelist will be used while exporting price to Shopify.
Import Order
With this configuration, the connector automatically imports new orders from Shopify to Odoo.
It ensures that the orders placed by customers on your Shopify store are seamlessly transferred to Odoo for further processing and fulfillment.
Order configuration and Workflow configuration will be used while import and process orders.
- Import Payout Reports
This automatic job allows for the automatic import of payout reports from Shopify to Odoo.
It retrieves the financial information related to payouts made by Shopify for the orders processed on your store.
Payout configuration will be used while import and process payout reports.
- Import Product’s Inventory
With this automatic job, the connector automatically imports the inventory levels of products from Shopify to Odoo.
It keeps the inventory data synchronized, ensuring that the stock levels in Odoo reflect the actual stock available on Shopify.
Validate Inventory Adjustment? configuration will be used while import product’s inventory.
Note
It’s important not to schedule all your processes to run at the same time interval because it can consume a significant amount of your system resources. Instead, it’s recommended to gap between them. This helps ensure that your system resources are not overuse and can handle the workload more efficiently.
Notification & Alerts
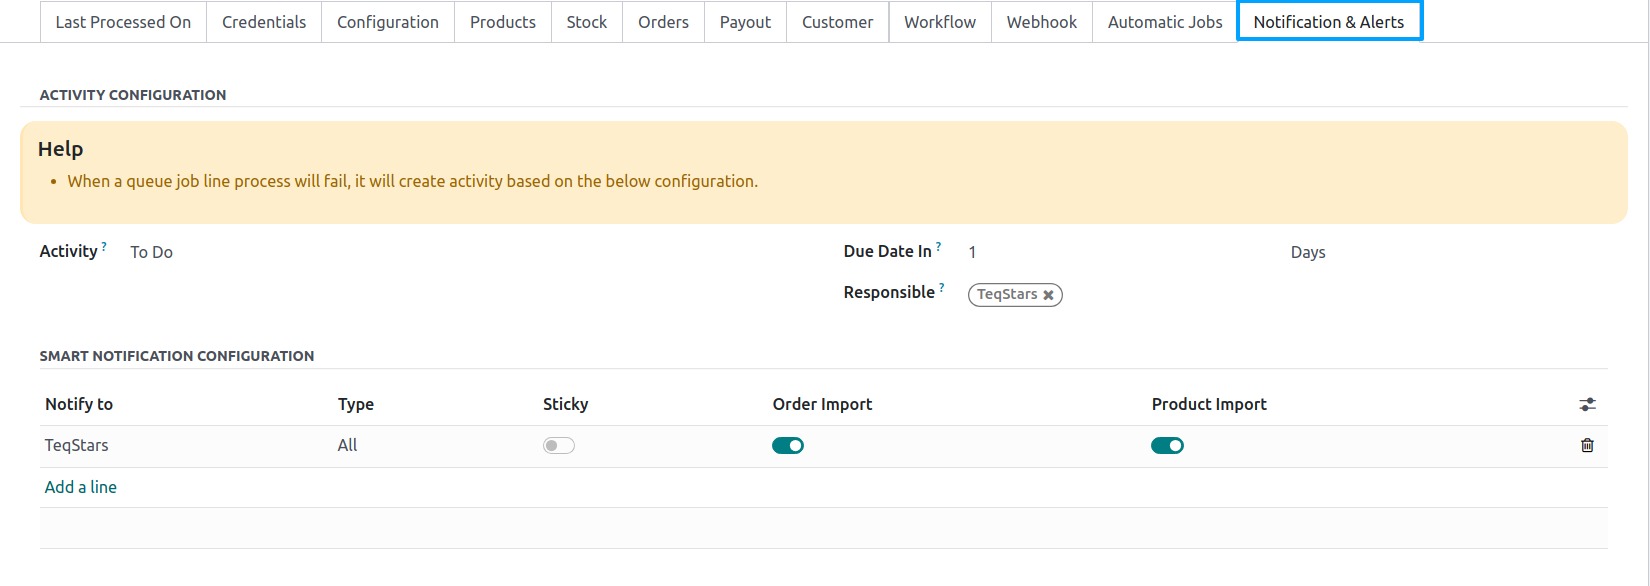
- Activity Configuration
When a queue job line process fails, the system create an activity based on the specified configuration.
By configuring Activity, Due Date In and Responsible the system can automatically generate an activity when a queue job line process fails. The activity will be assigned responsible person and categorized based on the specified type of activity. This helps ensure that appropriate follow-up actions are taken to address and resolve any issues or errors encountered during the Queue job process.
Smart Notification Configuration
By configuring Smart Notification Configuration, users will receive timely updates regarding the success or failure of order processing and product imports. This helps them stay informed and take appropriate actions promptly when needed.
Confirming Instance
Once you are satisfied with the configuration, click the
Confirmbutton. Upon pressing the Confirm button, your Shopify Odoo Instance will be confirmed. Shopify locations, Sales Channels, and Product Categories will be synced with your Odoo platform. Category import runs in the background after confirmation.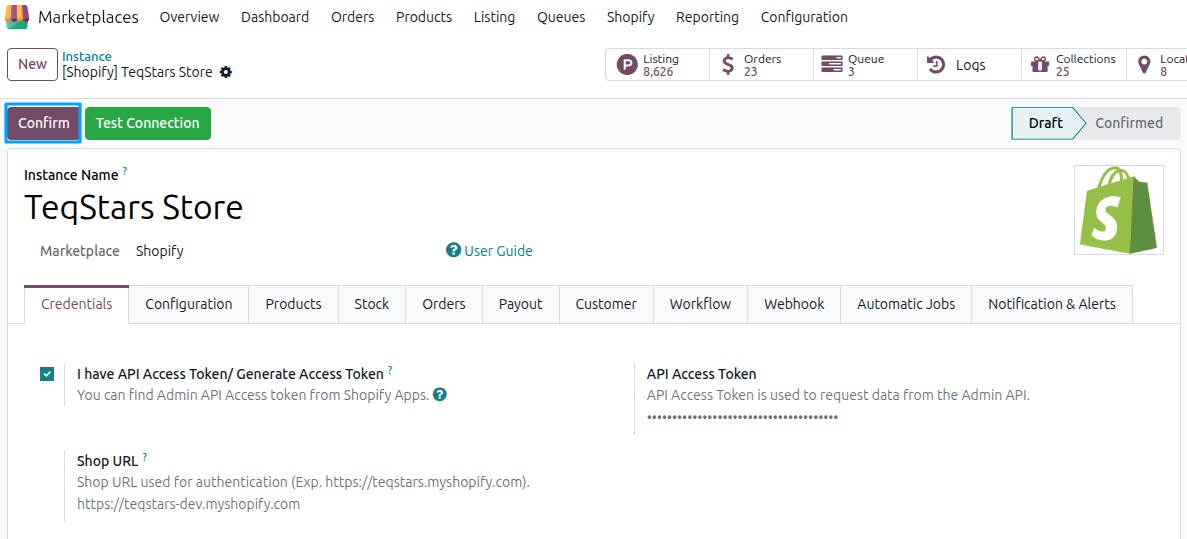
See also