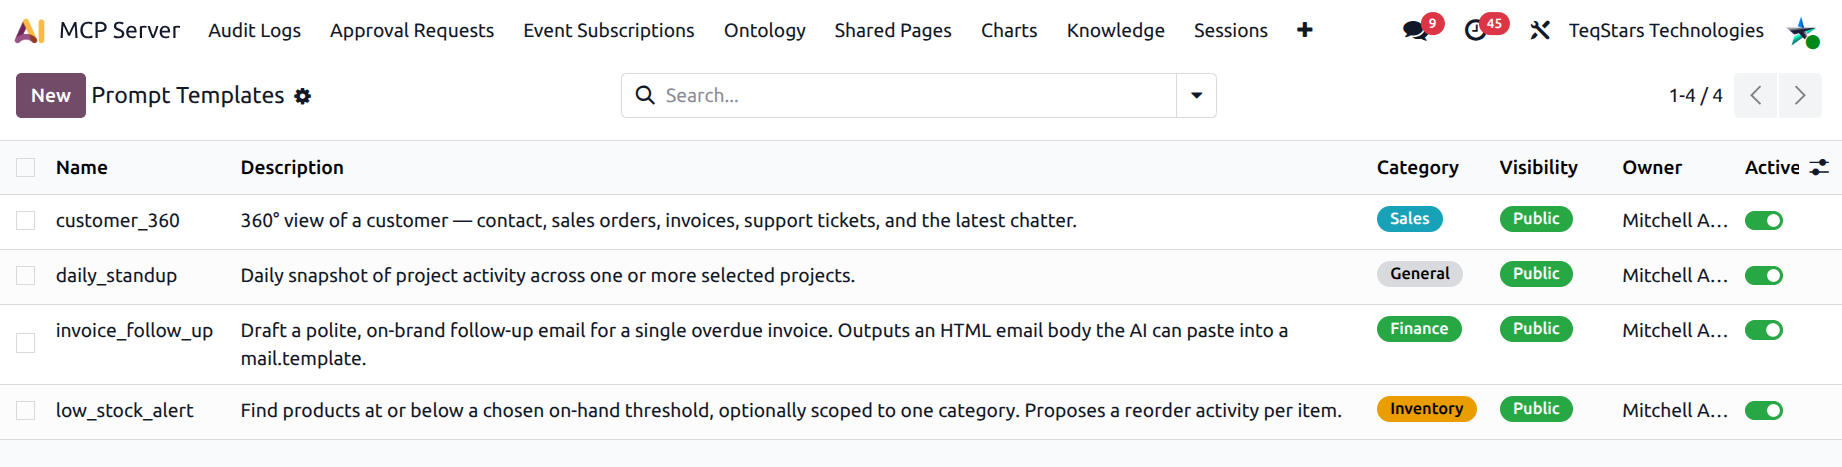
Prompt Templates
Prompt Templates are reusable, parameterised prompts the
AI can pull from your Odoo at any time via the standard
prompts/list and prompts/get MCP calls. They are how
you give your team a curated library of “ways to ask the AI”
without making everyone craft their own prompt every time.
Where to find them
.
The Prompt form
Fields:
Name — short identifier, e.g.
daily_standup,invoice_follow_up. This is what the AI client lists in its prompts library.Category — free-text tag for filtering.
Visibility
Private — only you (the owner) can see and use the template.
Shared — visible to a specific set of users picked in Shared With.
Public — visible to every MCP user.
Owner — defaults to the creating user.
Shared With — users who can see the template when visibility is Shared.
Description — short free-text explanation of when to use it.
Template — the actual prompt text. Use
{variable_name}for placeholders.Variables — declare each placeholder with name, description, type, required flag, and default value.
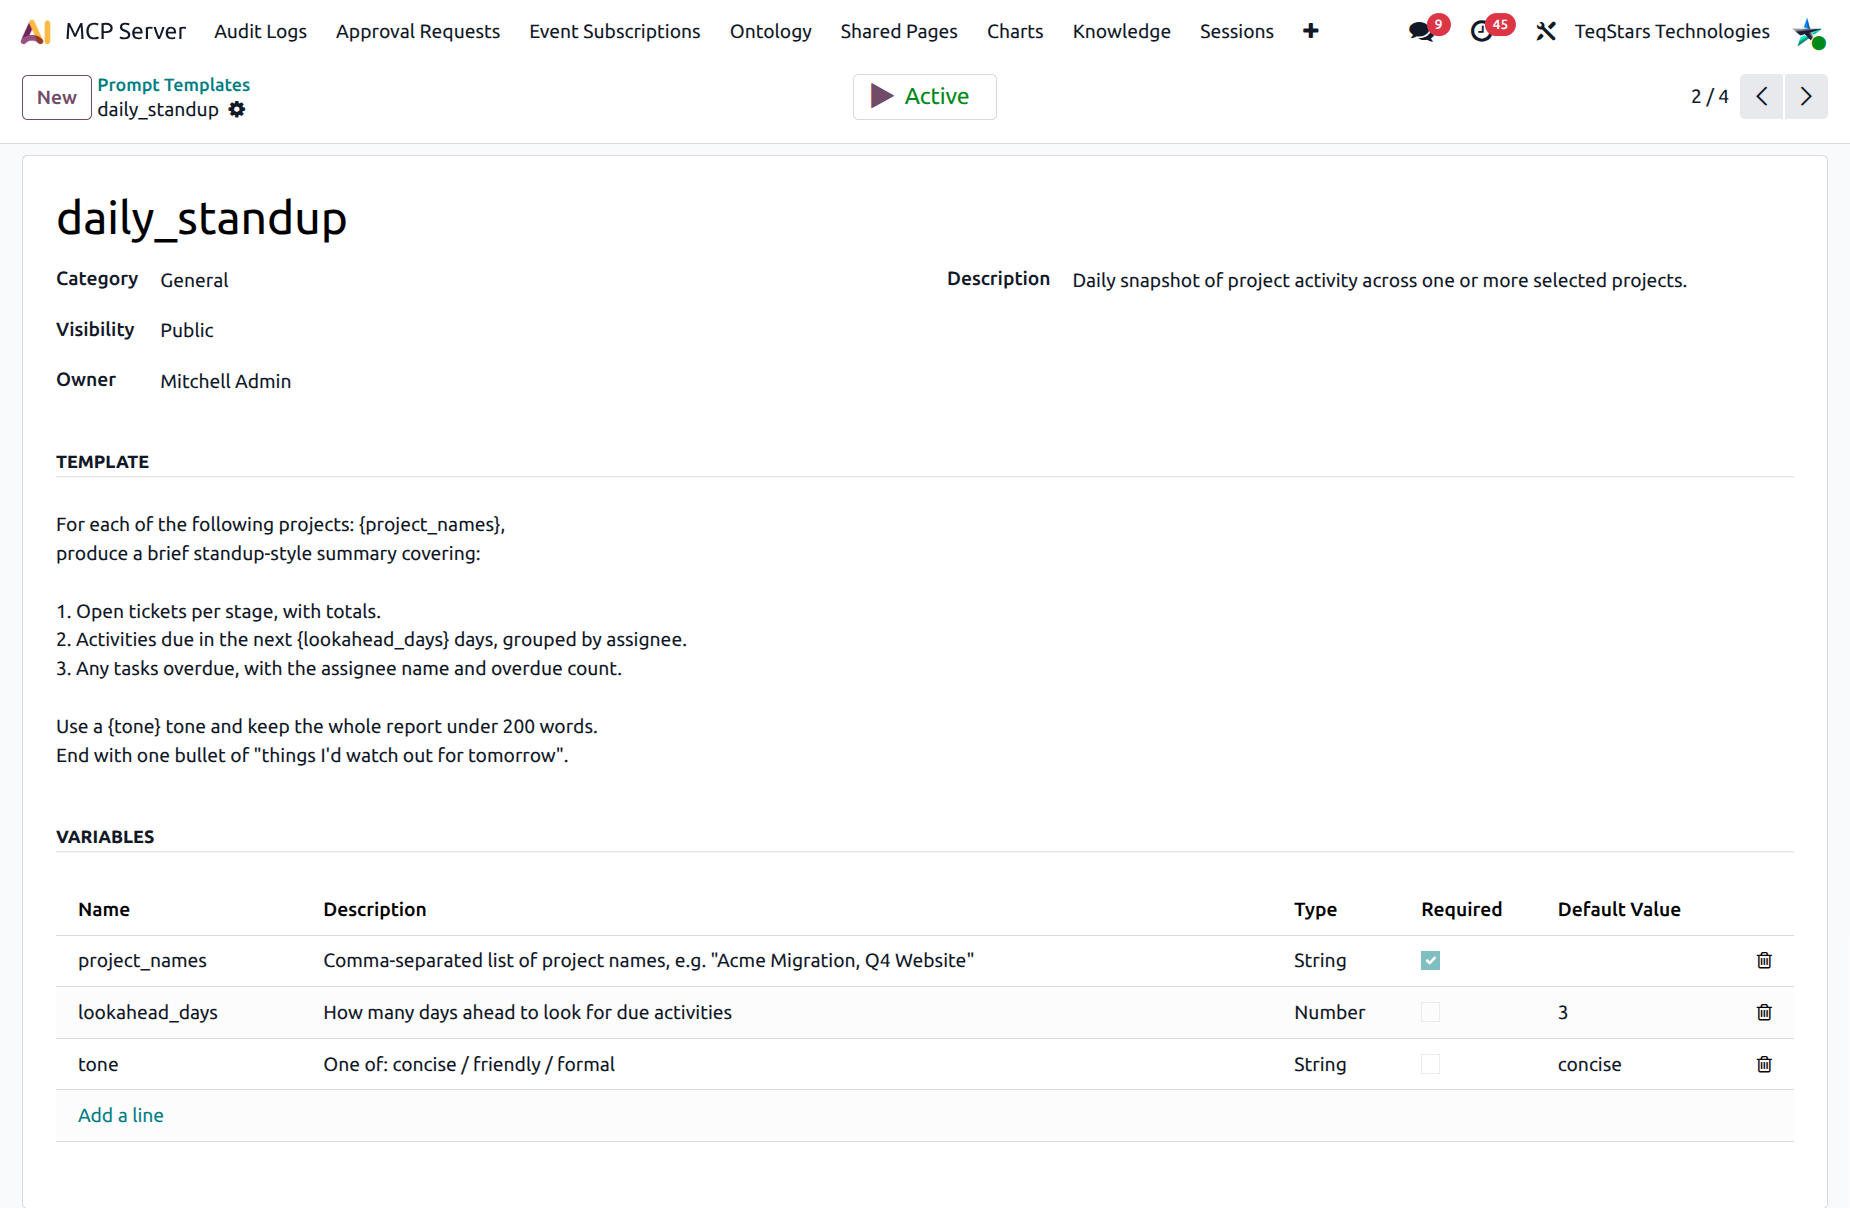
Sample template
A typical daily_standup template might look like:
For each of the following projects: {project_names},
summarise:

- Open tickets per stage
- Activities due in the next 3 days
- Anyone overdue, with their name and the count

Use the {tone} tone.
…with variables project_names (string, required) and
tone (string, default concise).
The user can then trigger the prompt in their AI client with one click, fill in the variables, and let the AI go.
How the AI uses templates
End-to-end flow
From the moment a user opens their AI client to the moment a template’s rendered text becomes the first message of the conversation:
Connect — the user’s AI client is already connected to your Odoo through an MCP connection (see Connect a New AI Tool).
Discover — on connection (or whenever the user opens the prompts UI), the client calls Odoo’s
prompts/listMCP method. Odoo returns every template the connection’s user can see — private templates they own, shared templates they’re on the recipient list of, and every public template active on the tenant.Pick — the client surfaces those templates in its UI (slash menu, prompt picker, sidebar — depends on the client, see below).
Fill the variables — the client opens a small form driven by the variable definitions on the template (name, type, required flag, default). The user fills in what is missing.
Render — the client calls
prompts/getwith the template name and the filled values. Odoo substitutes each{variable_name}in the body with the user’s value and returns the final plain-text prompt.Run — the AI client uses that text as the first user message of the conversation and proceeds normally — it calls MCP tools (
search_records,compose_dashboard,post_message…) just as if the user had typed the rendered prompt by hand.
Nothing about steps 3–6 is specific to this module — they are the standard MCP “Prompts” capability. The MCP Server just supplies the catalog.
The two MCP methods, in plain terms
prompts/list— “what reusable prompts can I offer this user?” Returns one entry per visible template: name, description, category, and the variable schema.prompts/get— “render template X with these values.” Returns the substituted text. Required variables that are missing cause an error — the AI client typically blocks the Submit button until they’re filled.
Configuring & using prompts in each AI client
Claude Desktop
Once the Odoo MCP server is connected, every template appears
under the / (slash-command) menu in the chat input. Type
/ and a list filtered by the template name drops down.
Pick one → Claude opens a small form for the required
variables → Submit → Claude renders the prompt and runs it.
No extra setup beyond the MCP connection itself.
Claude.ai (web)
In the connector you added for your Odoo, prompts show up in the “Available prompts” drawer next to the message composer. Click a prompt → fill the variable form → the rendered text drops into the composer ready to send. You can also edit it before sending.
Cursor
Open the chat panel and click the prompts icon (or
Cmd/Ctrl + Shift + P → Prompts). Cursor lists every
prompts/list entry from every connected MCP server,
grouped by server name. Pick → fill → submit.
Continue.dev
Continue exposes MCP prompts as slash commands. Type /
in the chat to see them — the template’s Name becomes the
slash command’s name (so prefer short, lowercase,
underscore-separated names like daily_standup).
Gemini CLI
In the CLI, run /mcp prompts to list available templates,
then /mcp prompts <name> to invoke one. The CLI prompts
for each variable interactively. After all values are
collected it calls prompts/get and pipes the rendered
text into the conversation.
ChatGPT (Custom Connector)
As of writing, ChatGPT’s MCP connector implementation
surfaces tools but does not yet surface prompts.
Templates created in Odoo will still appear via
prompts/list when ChatGPT supports them. In the meantime,
end users can simply copy the rendered prompt text from
another client and paste it into ChatGPT.
curl / scripts (advanced)
For automation or testing, render a template directly:
curl -X POST https://your-company.odoo.com/odoo/mcp \
  -H 'Authorization: Bearer mcp_ak_xxxxxxxx...' \
  -H 'Content-Type: application/json' \
  -d '{
    "jsonrpc":"2.0","id":1,
    "method":"prompts/get",
    "params":{
      "name":"daily_standup",
      "arguments":{
        "project_names":"Acme Migration, Q4 Website",
        "lookahead_days":3,
        "tone":"concise"
      }
    }
  }'
The response contains a messages array — the rendered
prompt ready to be sent as the first user turn.
Variables — what the client shows the user
The client builds the variable form from the Variables table on the template:
Required variables become required form fields. The Submit button stays disabled until they’re all filled.
Variables with a Default value are pre-populated; the user can change or leave them.
The Type drives the input control: string → text box, integer → number stepper, boolean → checkbox, enum → dropdown.
The Description is shown as helper text under the field — write it for the end user, not for the AI.
Visibility — who sees which template
A user’s prompts/list is filtered server-side by:
Public — every connected user sees it.
Shared — only users in the template’s Shared With list (and the owner) see it.
Private — only the owner sees it.
If a user opens their AI client, doesn’t see a template they expected, it’s almost always one of these three things:
The template is Inactive (toggle on the form).
The template is Private and they’re not the owner.
The template is Shared and they’re not on the Shared With list.
The MCP Administrator can audit who can see what by opening the Prompt Templates list and grouping by Visibility / Owner.
Tip
Roll out new templates as Shared with a small pilot
group first. Once the wording is right, switch
Visibility to Public. End users see the change on
their next prompts/list call — no client restart
required.
Use cases
Recurring reports — Weekly invoicing health check, Stale leads cleanup.
Standardised workflows — Send a polite payment reminder to {customer}.
Onboarding aides — Explain the Acme account setup steps to a new sales rep.
Approval-ready actions — Stage a mass mailing to all active customers in {country}.
Tip
Use the Shared visibility to roll out a template to a small group first. Once it works, switch it to Public for the whole company.
Active vs. Inactive
Deactivated templates stay in the database but disappear
from prompts/list. Use deactivation instead of deletion
to keep an audit trail of what your team has been using.
See also